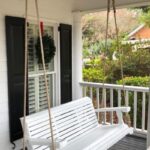
A porch swing is a great addition to any outdoor space, providing a cozy spot to relax and enjoy the fresh air. While you can easily purchase a porch swing from a retailer, building your own DIY porch swing can be a fun and rewarding project that allows you to customize the design to fit your style and needs. In this article, we’ll provide you with step-by-step instructions on how to build your own DIY porch swing.
Materials you will need: – Two 2×4 boards (8 feet long) – Two 1×4 boards (8 feet long) – One 1×6 board (8 feet long) – Two 2×2 boards (8 feet long) – Four eye bolts with washers and nuts – Rope or chain – Wood screws – Drill – Saw – Sandpaper – Paint or stain (optional)
Step 1: Cut the boards Start by cutting the 2×4 boards into two pieces each, measuring 48 inches long for the seat of the swing. Cut the 1×4 boards into two pieces each, measuring 48 inches long for the back of the swing. Cut the 1×6 board into two pieces, measuring 48 inches long for the arms of the swing. Cut the 2×2 boards into four pieces, measuring 18 inches long for the support braces.
Step 2: Assemble the frame Using wood screws, attach the 2×4 boards to the 2×2 support braces to create a rectangular frame for the seat of the swing. Make sure to space the support braces evenly along the length of the frame to provide stability.
Step 3: Attach the back Next, attach the 1×4 boards to the back of the frame using wood screws. Make sure to space the boards evenly and leave enough room at the top for the armrests.
Step 4: Add the arms Attach the 1×6 boards to the sides of the frame to create the armrests. Make sure the top of the armrests is level with the top of the back of the swing.
Step 5: Sand and finish Sand down any rough edges and surfaces to ensure a smooth finish. If desired, you can paint or stain the swing to match your outdoor decor.
Step 6: Attach the hardware Using a drill, attach eye bolts to the top corners of the back of the swing. Attach the rope or chain to the eye bolts, making sure to securely fasten them with washers and nuts.
Step 7: Hang the swing Find a sturdy beam or ceiling joist on your porch to hang the swing from. Use heavy-duty hooks or hardware to attach the swing to the beam or joist, making sure it is securely anchored.
Congratulations, you have successfully built your own DIY porch swing! Now all that’s left to do is sit back, relax, and enjoy your handcrafted creation. Be sure to regularly check the swing for any signs of wear or damage to ensure it remains safe and enjoyable for years to come.